
How BuffaLoRa nodes connect to the wider mesh
One of the most powerful features of Meshtastic is its ability to bridge local LoRa meshes to the Internet using MQTT (Message Queuing Telemetry Transport). This allows geographically separated meshes to interoperate and enables global visualization tools like MeshMap.net.
This guide walks through configuring a Meshtastic node to:
- Connect to the official Meshtastic MQTT broker
- Share node metadata and position reports
- Appear on MeshMap while respecting privacy controls
The examples shown are from the Meshtastic mobile app, but the same concepts apply across platforms. For authoritative reference, see the official Meshtastic documentation:
https://meshtastic.org/docs/software/mqtt/
What Is MQTT in Meshtastic?
MQTT is a lightweight publish/subscribe protocol commonly used in IoT systems. In Meshtastic, MQTT allows:
- Bridging messages between distant LoRa meshes
- Relaying node telemetry and metadata
- Publishing anonymized node locations for mapping
MQTT is completely optional. BuffaLoRa supports both RF-only operation and hybrid RF + Internet bridging. Each node operator controls how their node participates.
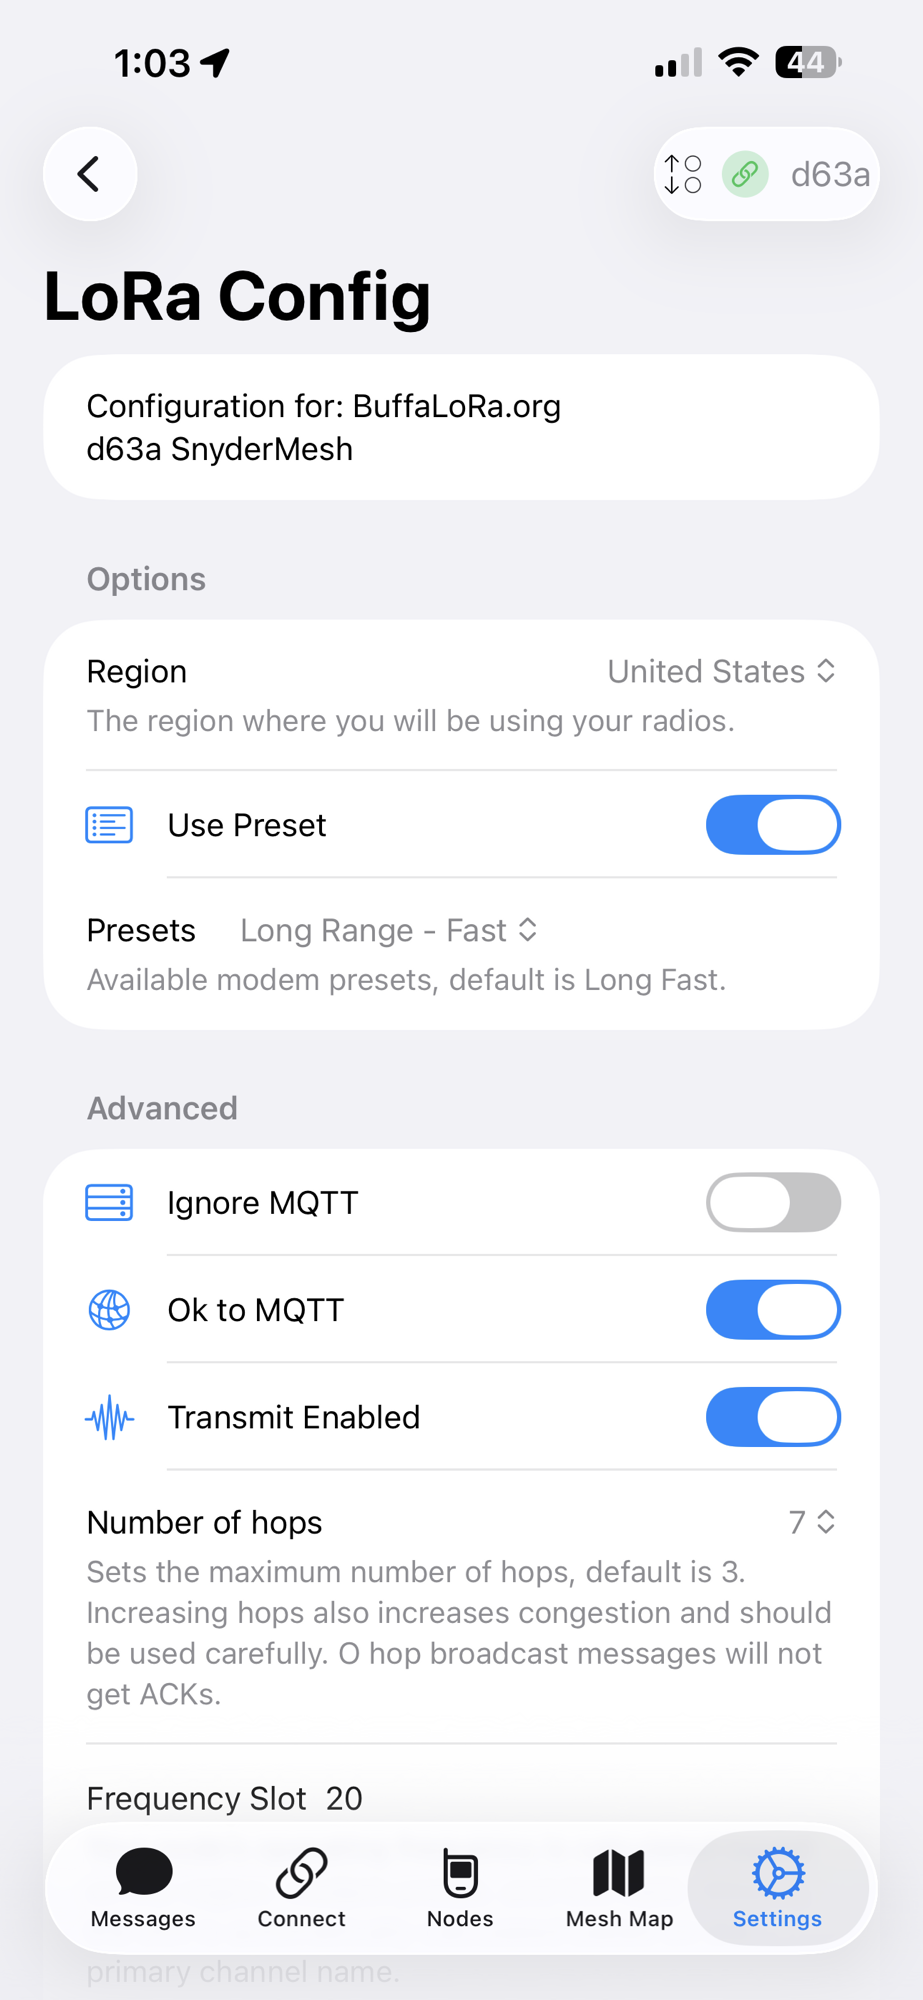
Step 1: Verify LoRa Configuration
Before enabling MQTT, confirm your LoRa settings are correct under Settings → LoRa Config.
- Region: United States
- Use Preset: ✅ Enabled
- Preset: Long Range – Fast (BuffaLoRa default)
- Transmit Enabled: ✅ On
- Number of Hops: Set appropriately for your area
MQTT-Related LoRa Options
- Ignore MQTT: ❌ Disabled
- Ok to MQTT: ✅ Enabled
These settings explicitly allow your node’s traffic and metadata to be forwarded over MQTT when applicable.
Step 2: Enable MQTT
Navigate to Settings → MQTT Config and enable the following:
- Enabled: ✅ On
- MQTT Client Proxy: ✅ On
- Connect to MQTT via Proxy: ✅ On
- Encryption Enabled: ✅ On
Using the MQTT Client Proxy allows your phone’s Internet connection to act as the gateway, which is ideal for mobile and testing scenarios.

Step 3: Enable Map Reporting (MeshMap)
MeshMap.net relies on periodic MQTT map reports sent by participating nodes. To enable this:
- Map Report: ✅ Enabled
- Consent to Share Unencrypted Node Data: ✅ Enabled
- Map Publish Interval: One Hour (recommended)
Map reports include node ID, name, hardware model, firmware version, LoRa region, modem preset, and approximate location. This data is one-way and does not allow remote control of your node.
Step 4: Configure Location Privacy
To balance visibility and privacy, Meshtastic allows you to share an approximate location instead of an exact GPS fix.
- Approximate Location: ✅ Enabled
- Location Radius: 1–2 miles recommended
Your node will appear on MeshMap near its actual position without revealing an exact address. BuffaLoRa strongly recommends this setting for personal or residential nodes.
Step 5: Confirm MQTT Server and Topic
Verify the MQTT connection details:
- Server Address:
mqtt.meshtastic.org - Root Topic:
msh/US/NY/WNY
This topic structure places your node in the Western New York namespace, allowing regional grouping on MeshMap and other MQTT-based tools.
📌 Note: For MQTT message bridging (beyond map reporting), uplink and downlink must also be enabled on the desired channels.
Map reporting works independently.
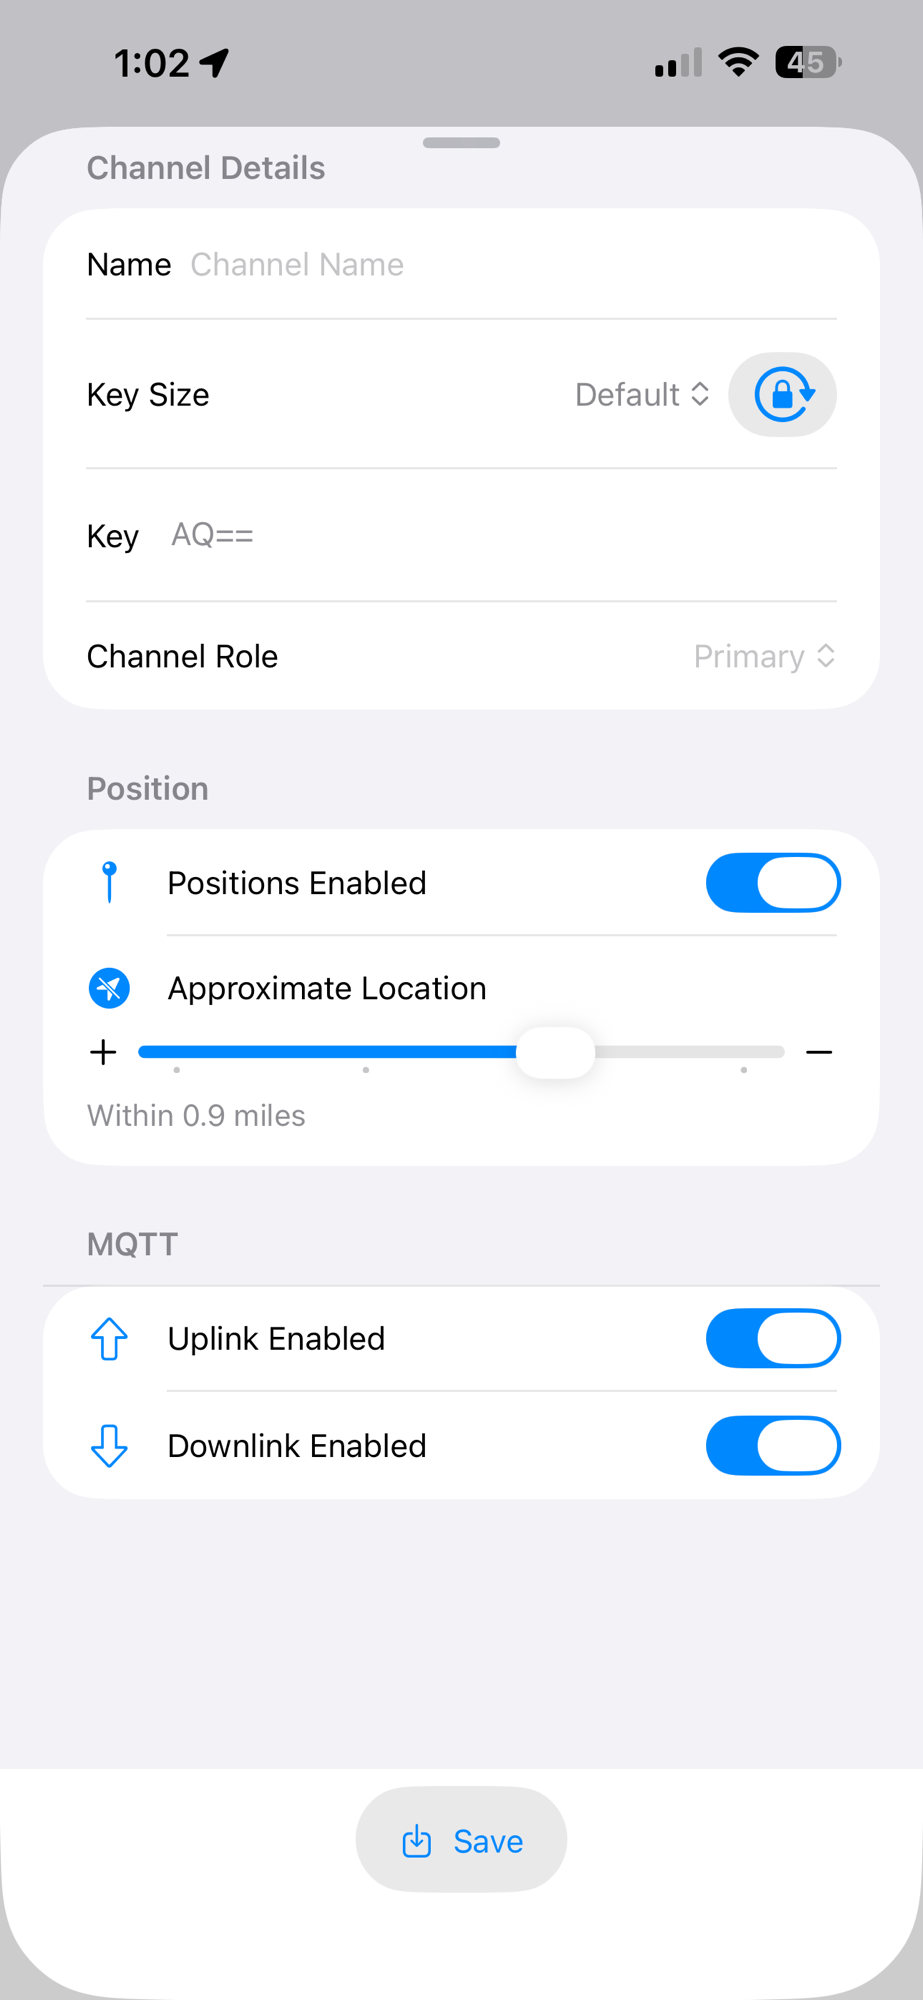
Step 6: Enable MQTT Uplink and Downlink on Your Channel
Enabling MQTT globally allows your node to connect to the broker, but
message bridging requires per-channel configuration.
Each channel you want to bridge must explicitly allow MQTT uplink and/or downlink.
Navigate to Settings → Channels → (Select Channel).
- MQTT Uplink: ✅ Enabled — publishes LoRa messages to MQTT
- MQTT Downlink: ✅ Enabled — injects MQTT messages into the local mesh
With both enabled, messages can flow from local LoRa meshes to remote mesh users over the Internet.
⚠️ Important: Default MQTT Channel Zero-Hop Policy
By design, the default MQTT channel uses a zero-hop policy.
- Messages arriving from MQTT are received by Internet connected mesh nodes on the same MQTT root topic
- They are not re-transmitted beyond the receiving node
- Downlinked messages are delivered locally but are not forwarded further over LoRa
This behavior prevents routing loops, limits congestion, and keeps MQTT bridging predictable. Multi-hop propagation of MQTT-originated traffic should only be enabled intentionally and with care.
Best Practices
- Enable MQTT only on channels intended for wide-area use
- Leave private or local-only channels unbridged
- Be mindful that bridged traffic increases message volume
Note: MQTT uplink and downlink are not required for MeshMap position reporting. Map reports are configured separately under MQTT settings.
When Should You Use MQTT?
MQTT is especially useful for:
- Linking with Internet connected BuffaLoRa nodes
- Operating gateway or relay nodes
- Visualizing regional coverage on MeshMap
- Event, emergency, and coordination scenarios
For grid-down or RF-only operation, MQTT can be disabled at any time without affecting local LoRa functionality.
Final Thoughts
MQTT extends Meshtastic from a local LoRa chat network into a globally aware, loosely federated mesh while preserving user choice and privacy.
By following the configuration outlined above, your node will:
- Participate in BuffaLoRa’s regional MQTT fabric
- Appear on MeshMap.net with privacy controls
- Strengthen situational awareness across Western New York
🦬 📡 BuffaLoRa — Building resilient mesh communications for Western New York
