📅 Tuesday, March 31 @ 6:30pm – 8:00pm
📍Bella Pizza – 5699 Herman Hill Rd, Boston, NY 14075
✉️ RSVP to hello@buffalora.org
In the mean time connect with us on LongFast or at:
Keeping WNY Connected, One Message at a Time

📅 Tuesday, March 31 @ 6:30pm – 8:00pm
📍Bella Pizza – 5699 Herman Hill Rd, Boston, NY 14075
✉️ RSVP to hello@buffalora.org
In the mean time connect with us on LongFast or at:

📅 Tuesday, February 24 @ 7:00pm – 9:00pm
📍Tea Leaf Cafe – 4224 Maple Rd. Suite 124 Amherst, NY 14226
✉️ RSVP to hello@buffalora.org
In the mean time connect with us on LongFast or at:

📅 Sunday, January 11th @ 1:00pm – 3:00pm
📍Panera Bread – 1747 Sheridan Dr, Tonawanda, NY 14223
✉️ RSVP to hello@buffalora.org
Hope to see you there!
In the meantime connect with the community on LongFast or on Discord:

📅 Sunday, December 7 @ 1:00pm – 3:00pm
📍TBD – Please propose a location
✉️ RSVP to hello@snydermesh.com
Community feedback on date/time/location welcome. Join us on Discord to discuss:

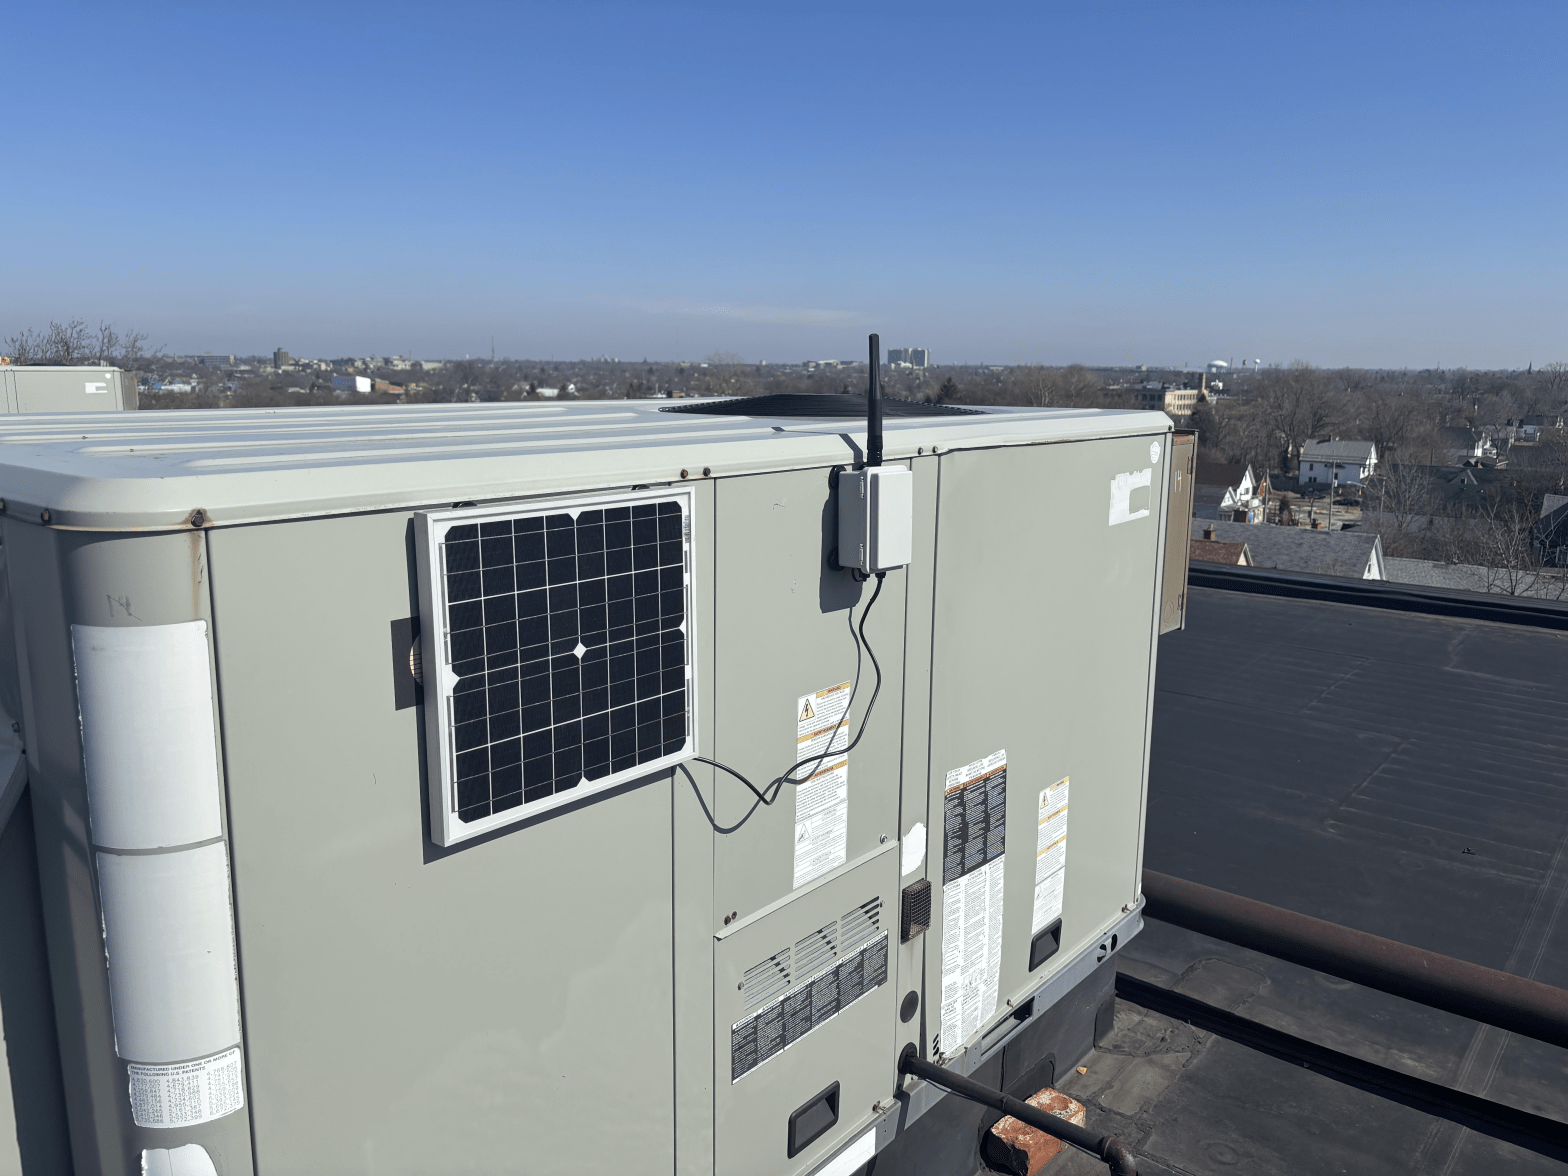
You can build your own Solar powered Meshtastic Node for less than $23. This project was inspired by the exceptional post on the official Meshtastic Blog: RAK WisBlock Harbor Breeze Solar Light Enclosure Hack.
Bill of Materials


Build instructions:
You can toggle the Solar Light function on or off depending on your requirements.
UPDATE: Because of concerns about potentially no solar charging occurring with the light switch in the off position, I leave my node enclosure in the on position and snip the wire leading to the LED board to prevent lighting while still allowing for optimal Meshtastic battery performance. The battery will provide about a week of power for the node even without very sunny days. A few hours of full sun per week will keep the node running indefinitely. I have confirmed that I get daytime solar charging with limited overnight power draw since no lights are running.
Hey BuffaLoRa community!
Unlike the often-discouraged repeater devices in Meshtastic, repeaters are the lifeblood of a MeshCore network. Because MeshCore companion devices don’t rebroadcast, repeaters are essential for bridging your traffic across the network. While this requires more nodes overall to build out the map, MeshCore compensates by allowing up to 64 hops between nodes, among other benefits.
Plus, these repeater nodes don’t need to be the powerhouses we typically think of in a Meshtastic network. MeshCore repeaters can use the exact same hardware you may have previously used as simple clients. If you’re interested in helping build out our WNY MeshCore network, I’ve put together this guide to get you started.
Ready? Let’s dive in.
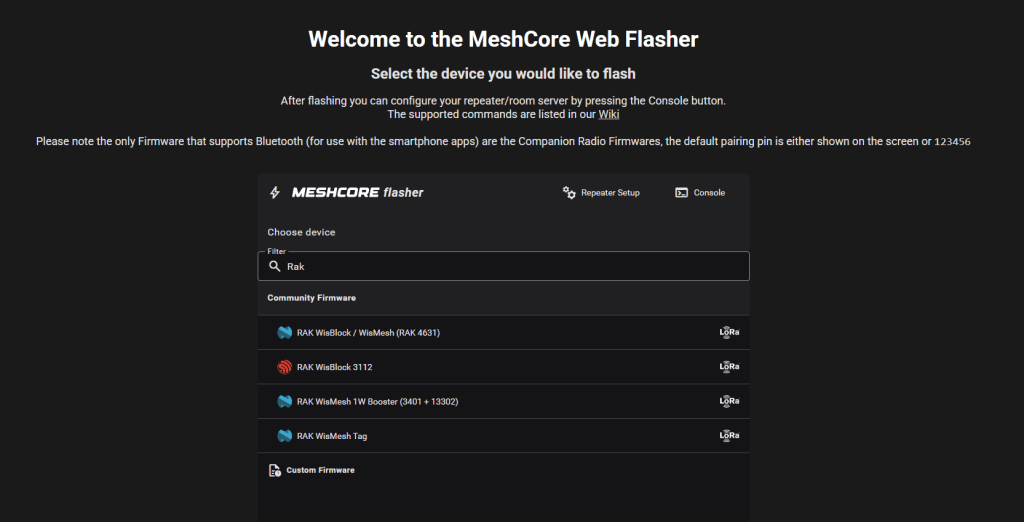
MeshCores web flasher in my experience is the easiest method of flashing the MeshCore firmware on your device.
1) Plug your device into a computer running Chrome or a Chromium-based browser (like Edge) and visit https://flasher.meshcore.co.uk/.
2) Select your device type. I usually start by typing the manufacturer’s name and then picking the specific board.
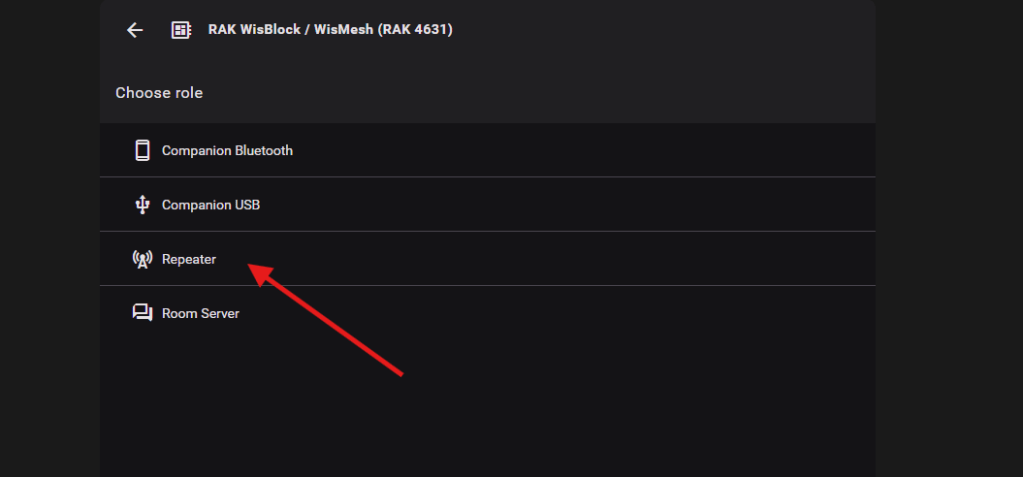
3) Choose “Repeater”
4) Flash your device. (Depending on your hardware, you may need to enter DFU mode first). Occasionally, you might get an error and need to repeat the process. The one time a flash failed for me, I just re-enabled DFU and tried again, and it worked perfectly the second time.
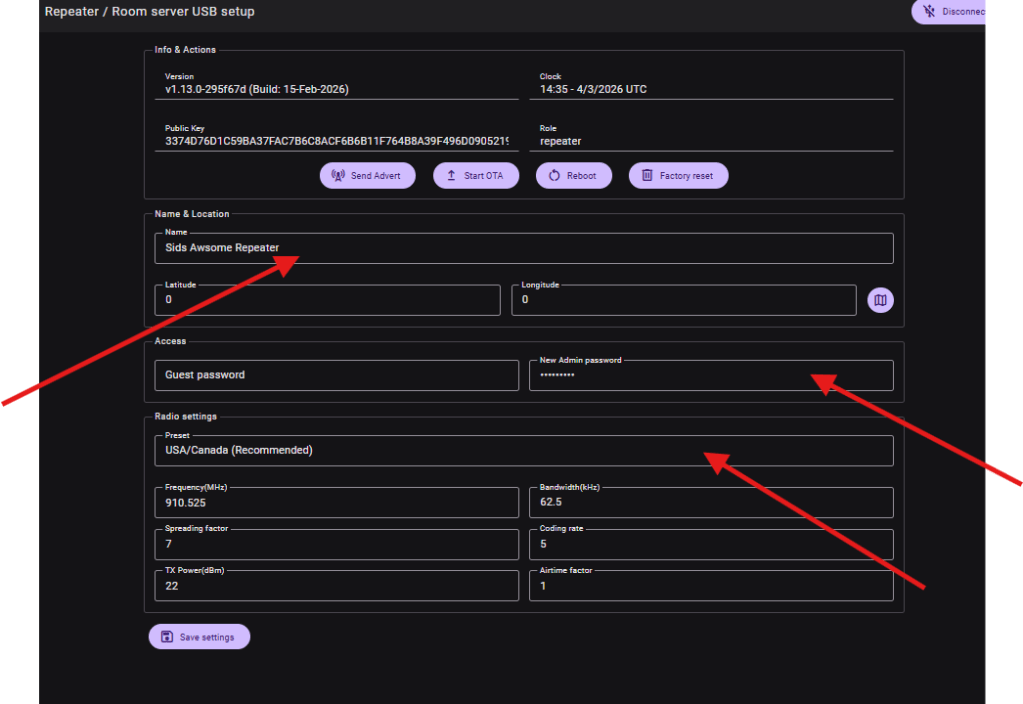
5) Note: MeshCore repeaters are not configured via Bluetooth! Select “Configure via USB.”

6) Configure your initial settings:
7) Congratulations you now have a functional Meshcore Repeater!!
Next we will will cover some settings I recommend.
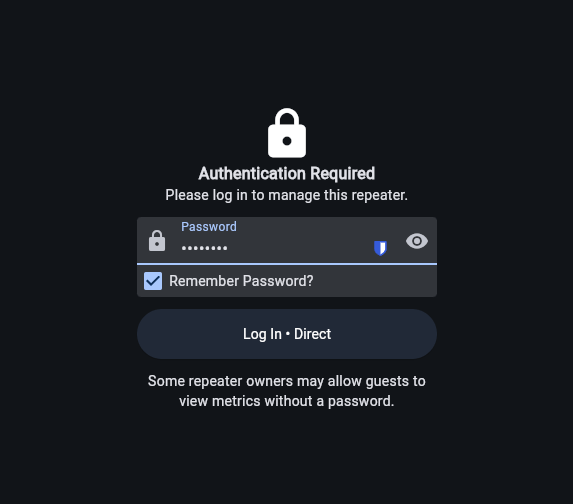
In order to configure a MeshCore Repeater, you must use a Meshcore core compaion device, or you can configure the node via USB using https://app.meshcore.nz/.
Start by selecting Settings and using the the Refresh icon to pull your device info. Check to ensure your Frequency is set to 910.525 MHz, and that you have your name set as your choosing.
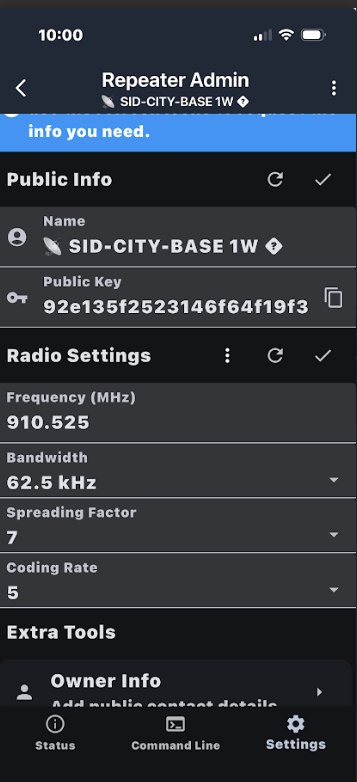
Owner Info is visible if a repeater is configured with a blank “Guest Password.” I choose to include my Call Sign and email address so that if there’s ever an issue with my repeater, other MeshCore users can notify me. This is completely up to you

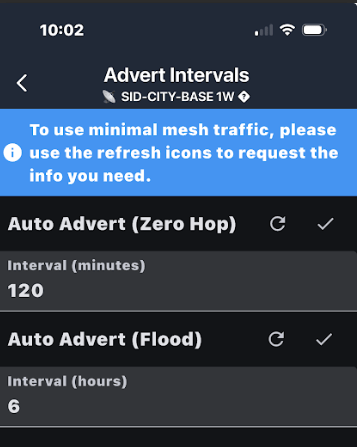
MeshCore is very light on flooding the network with announcements. Since we still have relatively few MeshCore Repeaters online in the spring of 2026, my recommendation is to set Zero Hop to 120 minutes, and Flood to 6 Hours.
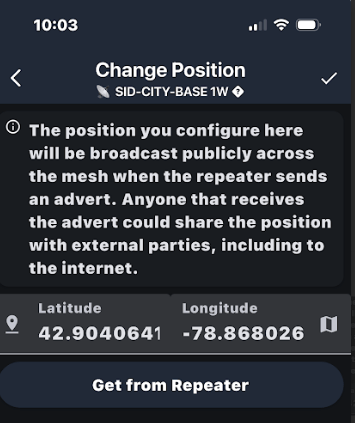
Whether you list your repeater’s position is your call. If you opt to set a position to help other Core users find your node, I have a few tips:
Sometimes you need to reboot your device several times and re-sync to get the clock correct. (Don’t worry, this is a known issue).
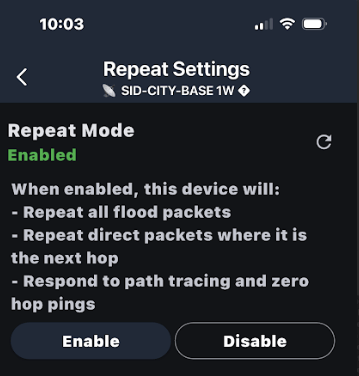
To actually help build the network, I highly recommend you ensure “Repeat Mode” is enabled.
Those are my standard recommendations, though your final config may vary depending on your specific hardware and deployment location. If at any time you run into issues with MeshCore, please don’t hesitate to reach out to me on Discord at @Sid-NY.
By Ehren Reynolds aka @Sid-NY on discord
Working in technology support and IT direction for over 16 years, I’ve seen countless network topologies succeed and fail. When it comes to building a resilient, off-grid communication backbone for Western New York, the challenge is unique. We need a system that can handle our notorious lake-effect weather, cover expansive terrain, and remain reliable when traditional grids go down.
Within the BuffaLora community, we frequently get asked: Which is better, Meshtastic or MeshCore? The truth is, neither is inherently superior—it completely depends on how you plan to use it. That is exactly why BuffaLora fully supports both platforms.
As we gear up this spring to deploy new solar-powered nodes across public properties and county parks, understanding the differences between these two protocols is crucial. Here is the breakdown.
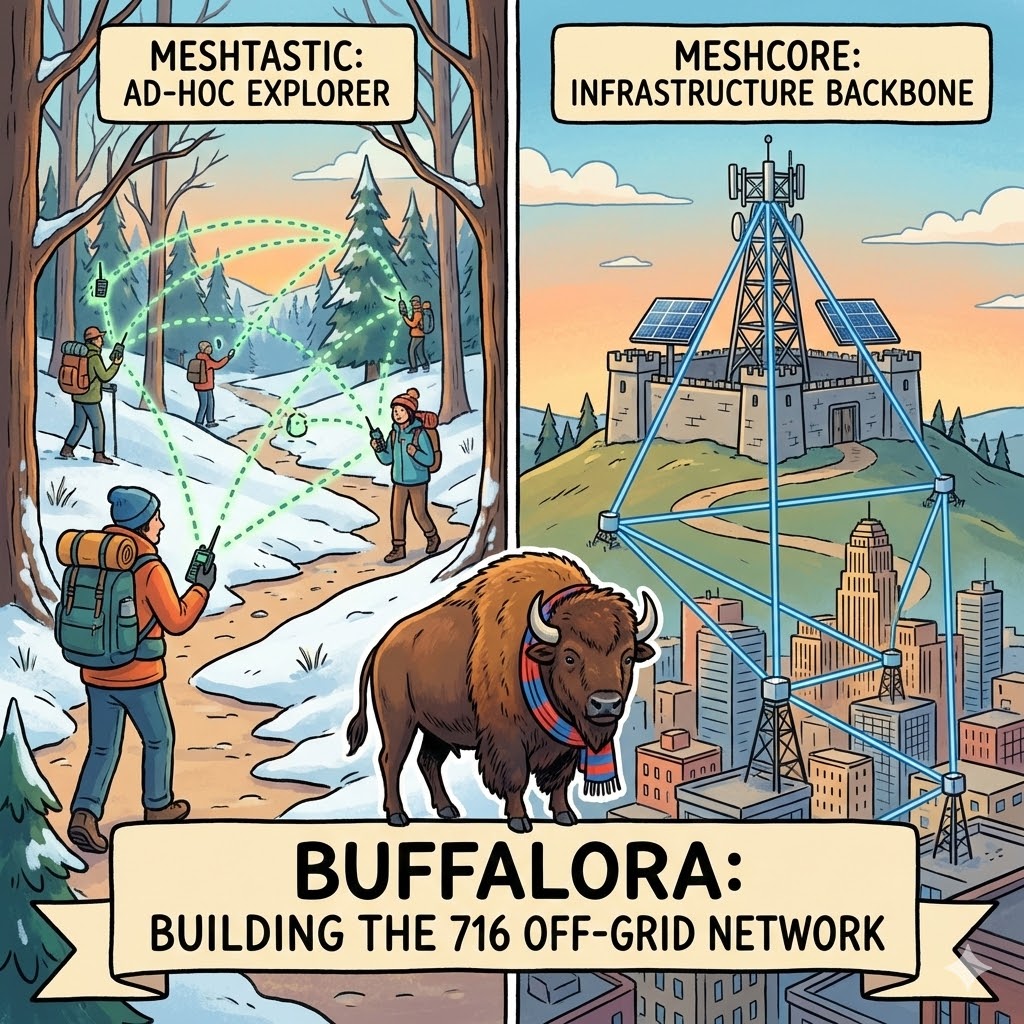
Meshtastic is the undisputed king of accessibility and ad-hoc networking. It is built on a dynamic, peer-to-peer architecture where every single node on the network (even the one in your pocket) can act as a relay to bounce messages.
While Meshtastic is fantastic for mobile groups, a dense network of moving nodes can eventually lead to congested airwaves. This is where MeshCore steps in. MeshCore adopts a structured, hierarchical network design. Instead of every device rebroadcasting, MeshCore uses fixed, dedicated “Repeater” nodes to handle the heavy lifting. The radios we carry—called “Companion” nodes—do not relay traffic, keeping the airwaves clear.
We recognize that the 716 needs both types of connectivity. If you are heading out to the gorge with a group of friends and need an instant, portable network, Meshtastic is your best bet.
However, if you want to connect to a highly reliable, city-wide backbone that functions more like standard SMS—powered by the stationary, solar repeaters we are actively deploying—MeshCore is the future of our regional infrastructure.
No matter which firmware you choose to run on your LoRa hardware, there is a place for you in our grid.
If you are curious about the technical reasons behind this shift for infrastructure, check out this excellent breakdown from EmComm Solutions:
This video discusses the differences between the two platforms and what you should consider before picking the right one for your environment and use case.
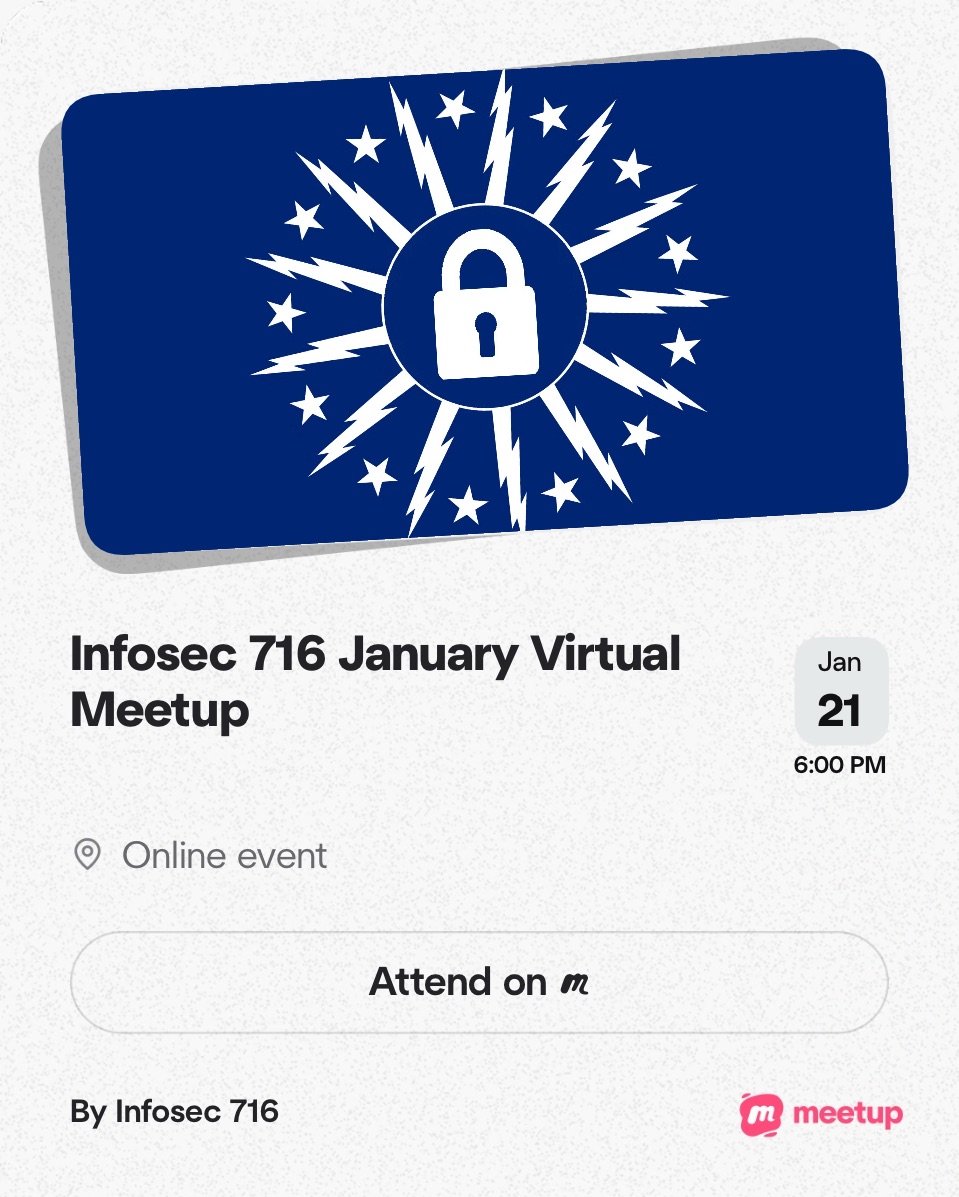
For InfoSec 716’s first meetup of the new year, they are thrilled to announce featured speaker SnyderMesh, presenting “Meshtastic – Decentralized Community-Wide Off-Grid Messaging”. Come learn about some cool mesh radio stuff, along with security news, the Dumpster Fire Of The Month, and all the other usual shenanigans!
PLEASE NOTE: This will be a HYBRID EVENT. If InfoSec 716 members would like to join us in person, we’ll be meeting at the Bit Haven hacker space, suite 351 in the Tri Main Building. We will also be streaming the meetup via Discord and Twitch. Whatever works for you, I hope you can join us!
📅 Wednesday, Jan 21 from 6:00pm to 8:00pm
📍 Online registration: https://www.meetup.com/infosec-716/events/312130046/
📼 Recording: https://youtu.be/_DsATlXy814?si=xp2z07R0YDAao90v
📉 Materials: https://docs.google.com/presentation/d/1VVVoQMXMgPYCw-R4lRBwmBVR-49oiXRfKXbuCuBd8Vw/edit?usp=drivesdk
We look forward to the opportunity to make further partnerships in the Western New York region, connecting new nodes but most importantly connecting people.

How BuffaLoRa nodes connect to the wider mesh
One of the most powerful features of Meshtastic is its ability to bridge local LoRa meshes to the Internet using MQTT (Message Queuing Telemetry Transport). This allows geographically separated meshes to interoperate and enables global visualization tools like MeshMap.net.
This guide walks through configuring a Meshtastic node to:
The examples shown are from the Meshtastic mobile app, but the same concepts apply across platforms. For authoritative reference, see the official Meshtastic documentation:
https://meshtastic.org/docs/software/mqtt/
MQTT is a lightweight publish/subscribe protocol commonly used in IoT systems. In Meshtastic, MQTT allows:
MQTT is completely optional. BuffaLoRa supports both RF-only operation and hybrid RF + Internet bridging. Each node operator controls how their node participates.
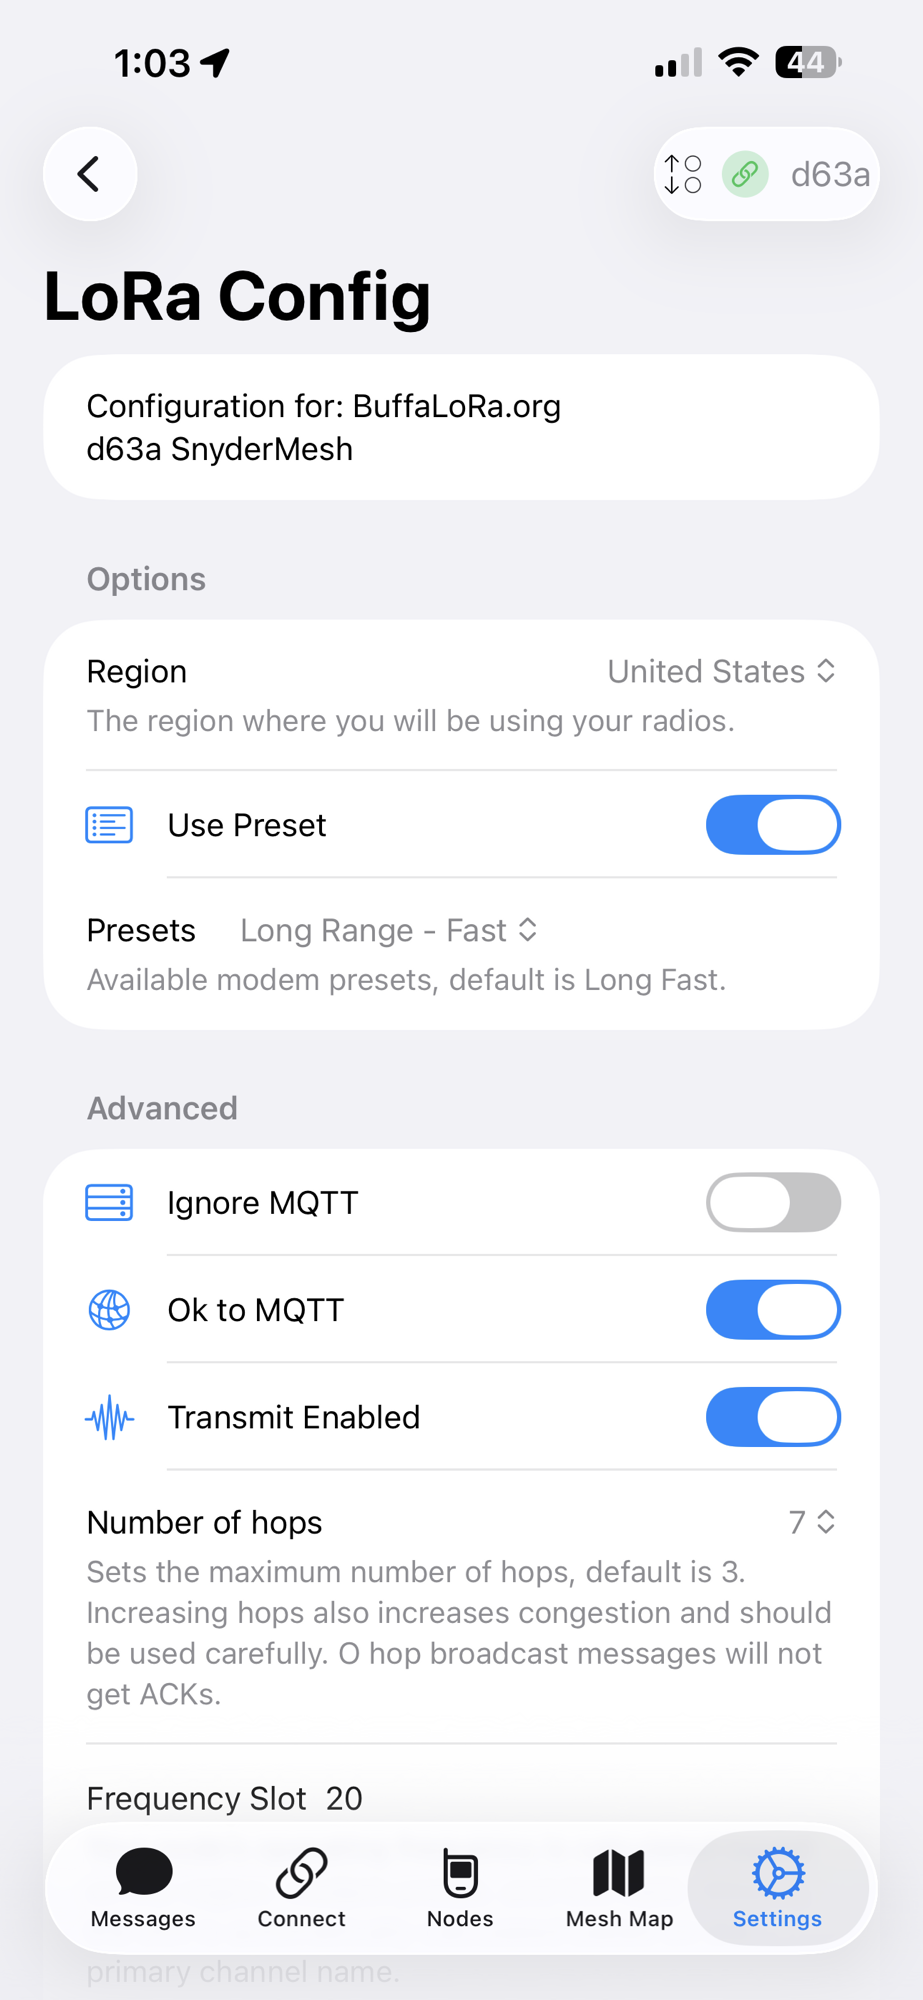
Before enabling MQTT, confirm your LoRa settings are correct under Settings → LoRa Config.
These settings explicitly allow your node’s traffic and metadata to be forwarded over MQTT when applicable.
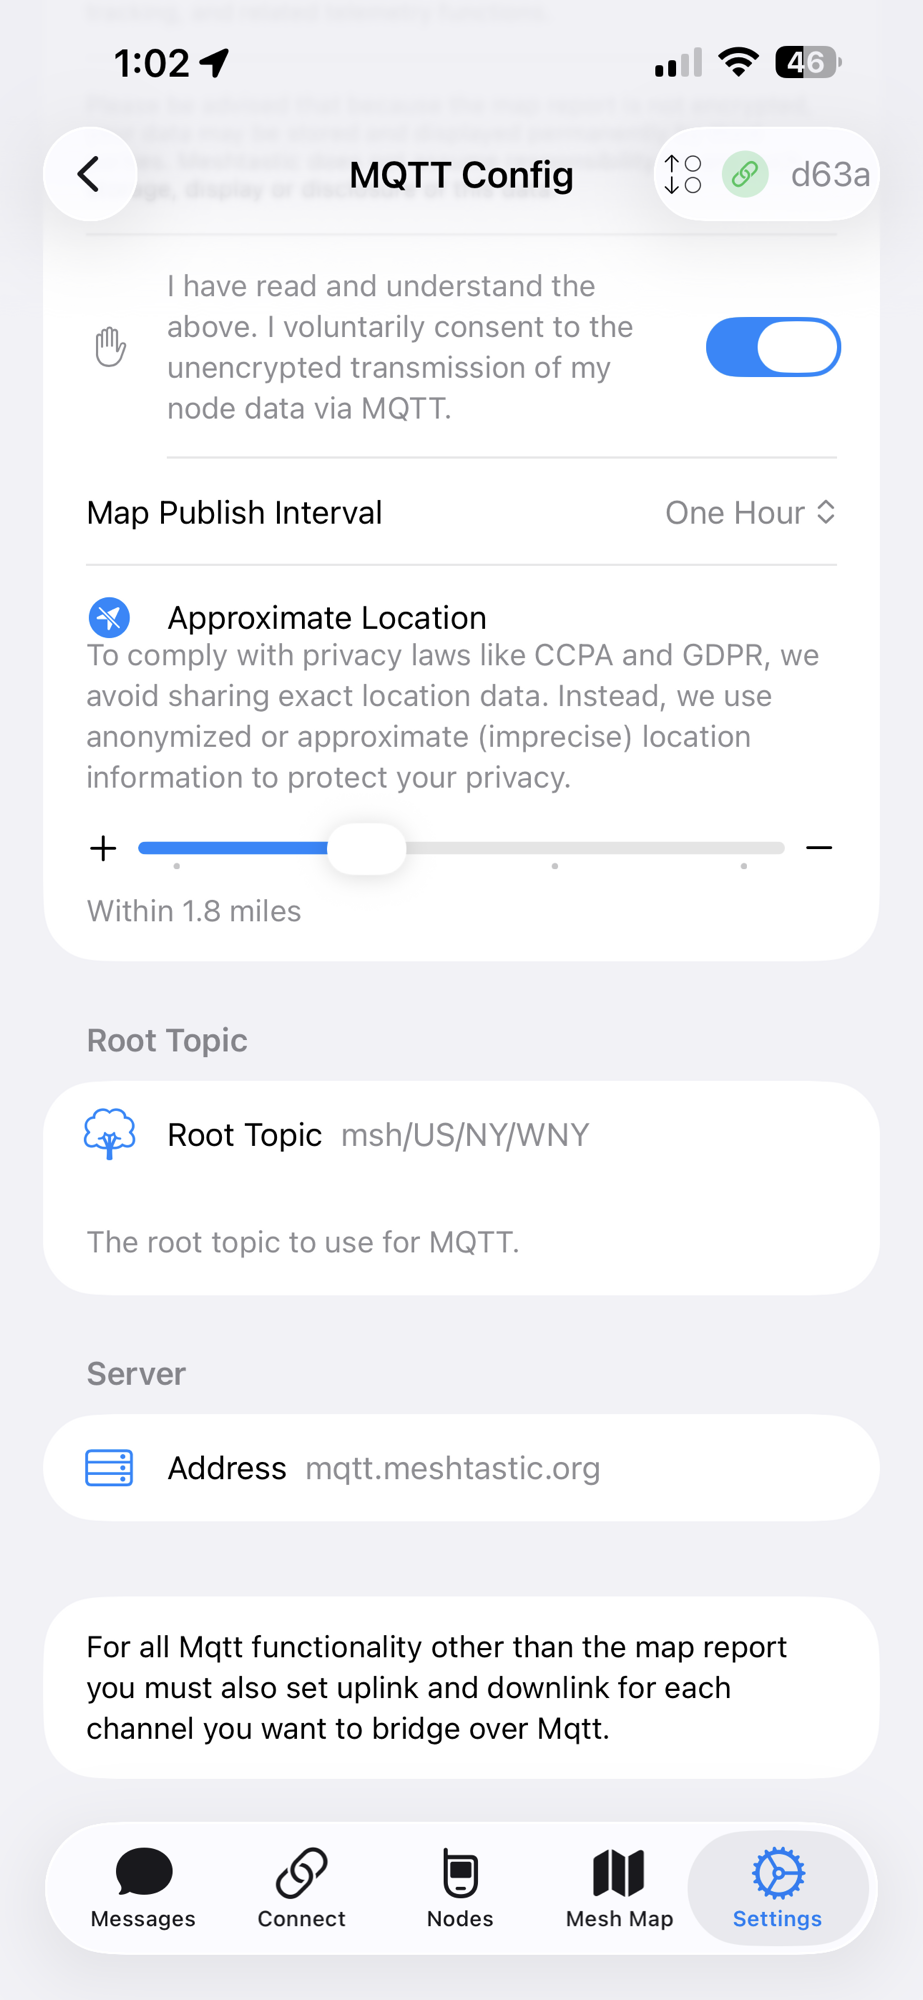
Navigate to Settings → MQTT Config and enable the following:
Using the MQTT Client Proxy allows your phone’s Internet connection to act as the gateway, which is ideal for mobile and testing scenarios.

MeshMap.net relies on periodic MQTT map reports sent by participating nodes. To enable this:
Map reports include node ID, name, hardware model, firmware version, LoRa region, modem preset, and approximate location. This data is one-way and does not allow remote control of your node.
To balance visibility and privacy, Meshtastic allows you to share an approximate location instead of an exact GPS fix.
Your node will appear on MeshMap near its actual position without revealing an exact address. BuffaLoRa strongly recommends this setting for personal or residential nodes.
Verify the MQTT connection details:
mqtt.meshtastic.orgmsh/US/NY/WNYThis topic structure places your node in the Western New York namespace, allowing regional grouping on MeshMap and other MQTT-based tools.
📌 Note: For MQTT message bridging (beyond map reporting), uplink and downlink must also be enabled on the desired channels.
Map reporting works independently.
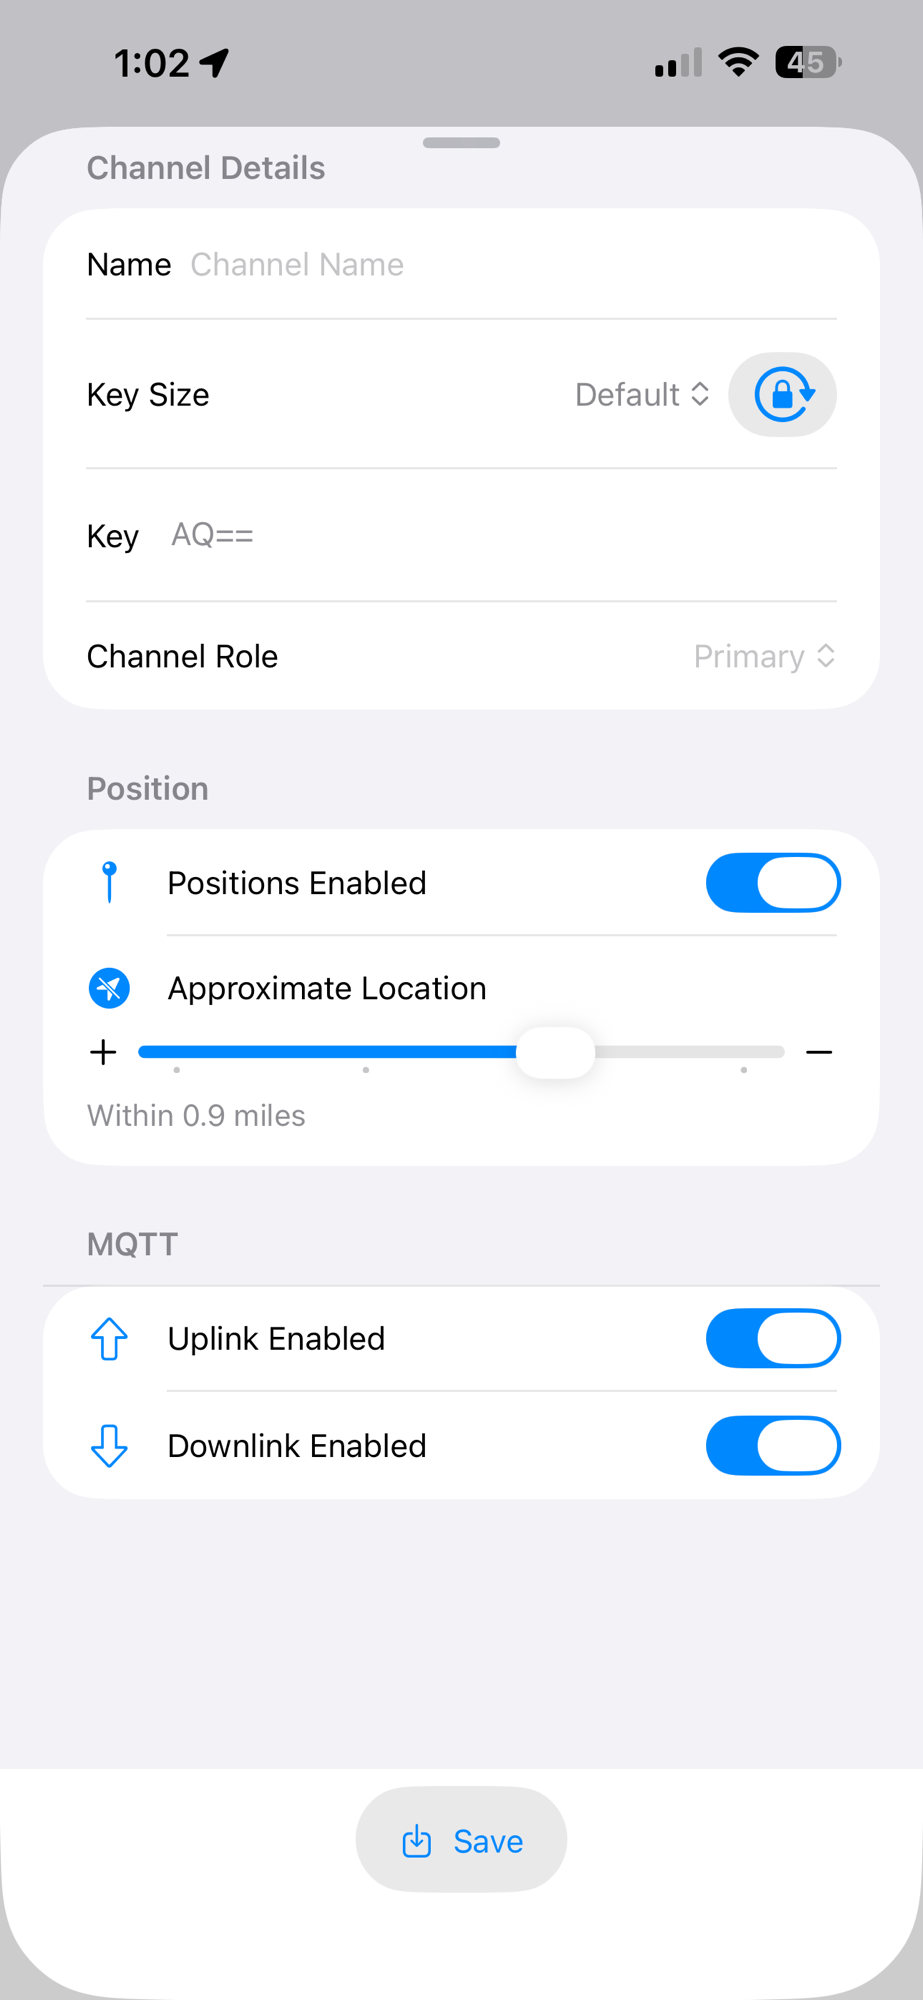
Enabling MQTT globally allows your node to connect to the broker, but
message bridging requires per-channel configuration.
Each channel you want to bridge must explicitly allow MQTT uplink and/or downlink.
Navigate to Settings → Channels → (Select Channel).
With both enabled, messages can flow from local LoRa meshes to remote mesh users over the Internet.
By design, the default MQTT channel uses a zero-hop policy.
This behavior prevents routing loops, limits congestion, and keeps MQTT bridging predictable. Multi-hop propagation of MQTT-originated traffic should only be enabled intentionally and with care.
Note: MQTT uplink and downlink are not required for MeshMap position reporting. Map reports are configured separately under MQTT settings.
MQTT is especially useful for:
For grid-down or RF-only operation, MQTT can be disabled at any time without affecting local LoRa functionality.
MQTT extends Meshtastic from a local LoRa chat network into a globally aware, loosely federated mesh while preserving user choice and privacy.
By following the configuration outlined above, your node will:
🦬 📡 BuffaLoRa — Building resilient mesh communications for Western New York
Stretch your mesh by stretching each hop by using zero-cost hops
— Read on meshtastic.org/blog/zero-cost-hops-favorite-routers/

When the power goes out, cell towers fail, or connectivity simply doesn’t exist, communication quickly becomes the most critical resource. Whether you’re preparing for severe weather, extended grid outages, or heading deep into the backcountry, Meshtastic offers a proven, low-power, community-driven solution for staying connected when traditional networks aren’t available.
Originally developed with backcountry hiking and adventure travel in mind, Meshtastic has evolved into a powerful tool for emergency preparedness, disaster response, and community resilience.
Meshtastic uses LoRa (Long Range) radio to create a self-healing mesh network. Each node acts as both a user device and a relay, passing messages onward to extend coverage well beyond what a single radio could reach.
As more nodes join the network, the mesh becomes
stronger, more redundant, and more reliable. This decentralized design is exactly what makes Meshtastic so effective during grid failures and in remote environments.
Meshtastic is not theoretical — it has already been used in real emergencies:
In each case, Meshtastic helped fill the gap left by centralized systems, allowing communities to coordinate, share status updates, and maintain
situational awareness.
One of Meshtastic’s most powerful features is GPS position beaconing. Many devices include built-in GPS and periodically transmit their location
across the mesh.
For advanced use cases, Meshtastic integrates with
ATAK (Android Tactical Assault Kit), allowing mesh-based chat and GPS data to appear directly on shared maps. This dramatically improves situational awareness for coordinated teams.
When Meshtastic is paired with a low-power computer such as a Raspberry Pi, small x86 system, or Docker container, the mesh becomes far more than just a messaging platform.
When internet access is intermittently available, a mesh-connected BBS node can pull in weather alerts and forecasts and redistribute them locally across the mesh.
When completely offline, store-and-forward messaging continues to function, ensuring critical information is never lost.
With sufficient storage, mesh-connected systems can also provide:
Meshtastic devices are designed for ultra-low power consumption, making daily carry and regular use practical.
Some devices also offer everyday utility features such as e-ink status displays and MagSafe / Qi phone charging, making them useful even outside of emergencies.
Permanent mesh infrastructure does not have to be expensive. DIY solar nodes can be built using hardware-store outdoor solar lights as enclosures,
18650 lithium batteries, and low-power LoRa radios.
These nodes can run for a week or more without sun and recharge fully in about one day of good sunlight.
For turnkey solutions, prebuilt solar nodes from vendors such as Seeed and PeakMesh are available starting around $100 and up.
Technology alone does not create resilience – people do. The BuffaLoRa mesh has already grown substantially, expanding coverage and strengthening regional preparedness.
We are deeply grateful for partnerships with BARRA and the opportunity to interconnect key sites such as
Cole Road and Kimball Hall repeater locations.
These collaborations are critical to building a resilient communications network.
Meshtastic empowers individuals, but it thrives through collective effort. Whether you are preparing for emergencies, exploring the backcountry, or experimenting with decentralized communications,
joining and using the mesh makes everyone stronger.
Preparedness isn’t just gear — it’s community.
And community is what makes the mesh strong.

One of the questions that comes up frequently in the BuffaLoRa community is: “How hard is it to update Meshtastic firmware over Bluetooth?” This week, I finally took the plunge and successfully performed an OTA (Over-The-Air) Bluetooth firmware update on one of my nRF52 based Meshtastic nodes (RAK WisMesh Tag) from iOS—and I’m happy to report that it worked exactly as advertised.
This post walks through the experience, highlights a few practical tips, and shows what the process looks like in the real world.
OTA firmware updates are a big deal for Meshtastic deployments, especially for:
Being able to update firmware wirelessly over Bluetooth saves time, reduces risk, and lowers the barrier to keeping nodes secure and up to date.
I followed the official Meshtastic documentation for nRF52 OTA updates, which you can find here:
👉 https://meshtastic.org/docs/getting-started/flashing-firmware/nrf52/ota/
The guide is clear and well-structured, and it closely matches what you’ll see in the Meshtastic tooling.
Before opening any mobile apps, I first downloaded the latest stable Meshtastic firmware for my hardware.
I navigated to the official Meshtastic downloads page:
👉 https://meshtastic.org/downloads/
From there, I followed the link to the Official Meshtastic GitHub releases and downloaded the appropriate firmware ZIP file for my node.
For my device (an nRF52840-based node), the correct file was:
firmware-nrf52840-2.7.15.567b8ea.zip
I downloaded the ZIP file locally on my phone so it would be available to select during the OTA update process.
I then used the Files app to open and “unzip” this file, allowing access to the device specific ZIP files within.

All subsequent steps were performed using Nordic Semiconductor’s nRF Device Firmware Update app, which is required for Bluetooth DFU.
The app is available on the Apple App Store:
nRF Device Firmware Update (iOS)
Once installed, I opened the app and saw that I landed on the Firmware Upgrade screen.
Before starting the update, I clicked on Settings to review and edited the DFU settings in the app:

It is critical to change the “Number of Packets” setting to a lower number. This ensures that less data is sent to the device over Bluetooth at a time between confirmations during the OTA update process. The other default settings worked perfectly for my node—no additional tuning required.
Click back to the Firmware Upgrade screen to save the changes.
Within the nRF Device Firmware Update app screen, I selected:
firmware-nrf52840-2.7.15.567b8ea) and navigated within to select an embedded ZIP file specific to my device (firmware-rak_wismesh_tag-2.7.15.567b8ea.zip)Meshtastic_65c2)At this point, the app verified the file and prepared the device for DFU (Device Firmware Update) mode.
I then clicked Upload. Once initiated, the app walked through the DFU process automatically:
The progress bar advanced steadily, and the app provided real-time feedback, including transfer speed. In my case, the upload ran at about 1.5 kB/s, which is normal for Bluetooth LE DFU.

Tip: Avoid backgrounding the app or letting your phone lock during the upload.
Once the firmware upload completed, the node rebooted and reconnected normally. After reconnecting:
In short: a smooth, successful OTA update.

nrf52840 vs nrf52832). Flashing the wrong target can result in a non-booting node.If you’ve done an OTA update—or are planning one—consider sharing your experience with the BuffaLoRa community. The more we document real-world workflows, the easier it becomes for everyone to grow the mesh.
📡 Stay connected, and keep the mesh strong.
